Deployment with Kubeflow Pipelines
This page explains how to convert your Kedro pipeline to use Kubeflow Pipelines, an open-source toolkit for machine learning (ML). You can use it to deploy ML workflows onto Kubernetes.
Why would you use Kubeflow Pipelines?
Kubeflow Pipelines is an end-to-end (E2E) orchestration tool to deploy, scale and manage your machine learning systems within Docker containers. You can schedule and compare runs, and examine detailed reports on each run.
Here are the main reasons to use Kubeflow Pipelines:
It is cloud-agnostic and can run on any Kubernetes cluster
Kubeflow is tailored towards machine learning workflows for model deployment, experiment tracking, and hyperparameter tuning
You can re-use components and pipelines to create E2E solutions
Prerequisites
To use Kubeflow Pipelines, make sure you have the following prerequisites in place:
Kubeflow Pipelines is installed on your Kubernetes cluster
Kubeflow Pipelines SDK is installed locally
A
nameattribute is set for each Kedro node since it is used to trigger runsAll node input/output DataSets must be configured in
catalog.ymland refer to an external location (e.g. AWS S3); you cannot use theMemoryDataSetin your workflow
Note
Each node runs in its own container.
How to run your Kedro pipeline using Kubeflow Pipelines
Containerise your Kedro project
First, you need to containerise your Kedro project, using any preferred container solution (e.g. Docker), to build an image to use in Kubeflow Pipelines.
For the purpose of this walk-through, we are going to assume a Docker workflow. We recommend the Kedro-Docker plugin to streamline the process. Instructions for Kedro-Docker are in the plugin’s README.md.
After you’ve built the Docker image for your project locally, transfer the image to a container registry.
Create a workflow spec
A workflow spec is a yaml file specifying the description of deployment in Kubernetes. In order to build a workflow spec for your Kedro pipeline programmatically you can use the following Python script that should be stored in your project’s root directory:
# <project_root>/build_kubeflow_pipeline.py
import re
from pathlib import Path
from typing import Dict, Set

import click

from kfp import aws, dsl
from kfp.compiler.compiler import Compiler

from kedro.framework.project import pipelines
from kedro.framework.startup import bootstrap_project
from kedro.pipeline.node import Node

_PIPELINE = None
_IMAGE = None


@click.command()
@click.argument("image", required=True)
@click.option("-p", "--pipeline", "pipeline_name", default=None)
@click.option("--env", "-e", type=str, default=None)
def generate_kfp(image: str, pipeline_name: str, env: str) -> None:
    """Generates a workflow spec yaml file from a Kedro pipeline.

    Args:
        image: container image name.
        pipeline_name: pipeline name to build a workflow spec.
        env: Kedro configuration environment name.

    """
    global _PIPELINE
    global _IMAGE
    _IMAGE = image

    project_path = Path.cwd()
    metadata = bootstrap_project(project_path)
    project_name = metadata.project_name

    pipeline_name = pipeline_name or "__default__"
    _PIPELINE = pipelines.get(pipeline_name)

    Compiler().compile(convert_kedro_pipeline_to_kfp, project_name + ".yaml")


@dsl.pipeline(name="Kedro pipeline", description="Kubeflow pipeline for Kedro project")
def convert_kedro_pipeline_to_kfp() -> None:
    """Convert from a Kedro pipeline into a kfp container graph."""
    node_dependencies = _PIPELINE.node_dependencies
    kfp_ops = _build_kfp_ops(node_dependencies)
    for node, dependencies in node_dependencies.items():
        for dependency in dependencies:
            kfp_ops[node.name].after(kfp_ops[dependency.name])


def _build_kfp_ops(
    node_dependencies: Dict[Node, Set[Node]]
) -> Dict[str, dsl.ContainerOp]:
    """Build kfp container graph from Kedro node dependencies."""
    kfp_ops = {}

    for node in node_dependencies:
        name = clean_name(node.name)
        kfp_ops[node.name] = dsl.ContainerOp(
            name=name,
            image=_IMAGE,
            command=["kedro"],
            arguments=["run", "--node", node.name],
        ).apply(
            # Configure the container to use AWS credentials.
            aws.use_aws_secret(
                "aws-secrets", "AWS_ACCESS_KEY_ID", "AWS_SECRET_ACCESS_KEY"
            )
        )
    return kfp_ops


def clean_name(name: str) -> str:
    """Reformat a name.

    Returns:
        name: formatted name.

    """
    return re.sub(r"[\W_]+", "-", name).strip("-")


if __name__ == "__main__":
    generate_kfp()
The script accepts one required argument:
image: image transferred to the container registry
You can also specify two optional arguments:
--pipeline: pipeline name for which you want to build a workflow spec--env: Kedro configuration environment name, defaults tolocal
For the purpose of this walk-through, we are going to use AWS S3 bucket for DataSets therefore AWS_ACCESS_KEY_ID and AWS_SECRET_ACCESS_KEY environment variables must be set to have an ability to communicate with S3. The AWS_ACCESS_KEY_ID and AWS_SECRET_ACCESS_KEY values should be stored in Kubernetes Secrets (an example Kubernetes Secrets spec is given below).
Finally, run the helper script from project’s directory to build the workflow spec (the spec will be saved to <project_root>/<project_name>.yaml file).
$ cd <project_root>
$ python build_kubeflow_pipeline.py <project_image>
Authenticate Kubeflow Pipelines
Before submitting the workflow spec you need to deploy your AWS credentials to Kubernetes Secrets. You should also ensure that the credentials you are going to use have all necessary permissions to the relevant S3 resources.
Here’s an example Secrets spec:
# secret.yml
apiVersion: v1
kind: Secret
metadata:
  name: aws-secrets
  namespace: kubeflow
data:
  AWS_ACCESS_KEY_ID: <AWS_ACCESS_KEY_ID value encoded with base64>
  AWS_SECRET_ACCESS_KEY: <AWS_SECRET_ACCESS_KEY value encoded with base64>
type: Opaque
Note
Kubeflow uses kubeflow as the default namespace.
You can use the following command to encode AWS keys to base64:
$ echo -n <original_key> | base64
Run the following commands to deploy the Kubernetes Secrets to the kubeflow namespace and check that it was created:
$ kubectl create -f secret.yml
$ kubectl get secrets aws-secrets -n kubeflow
You can find more information about AWS configuration in the Kubeflow Pipelines documentation.
Upload workflow spec and execute runs
Once a Kubernetes Secrets is deployed, upload the workflow spec <project_name>.yaml to Kubeflow. Below is the example of how to upload and execute the Kubeflow Pipelines through the UI (see how to open the pipelines dashboard).
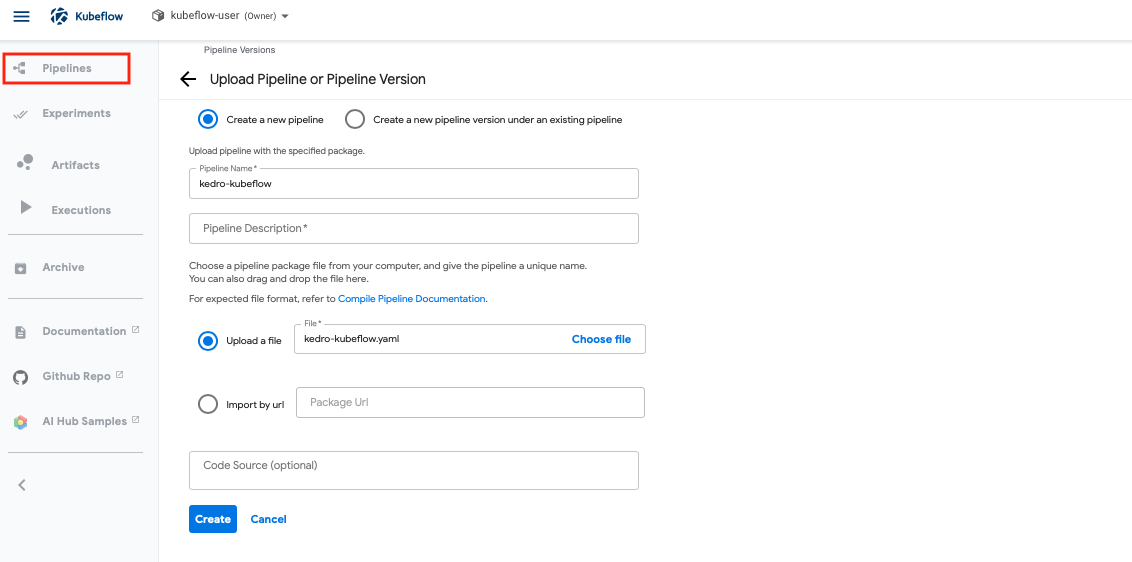
First, go to “Pipelines” on the left panel, and click “Upload pipeline”, and you will see the following page to upload your workflow spec.
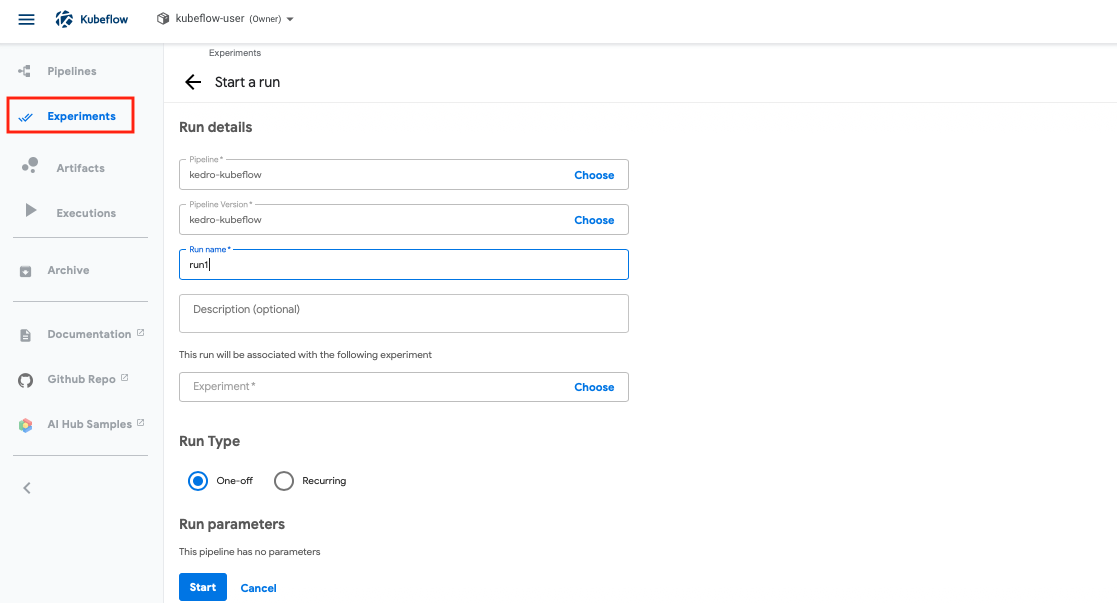
Once you have uploaded the workflow spec, go to “Experiments”, and select the pipeline you want to run in the following page.
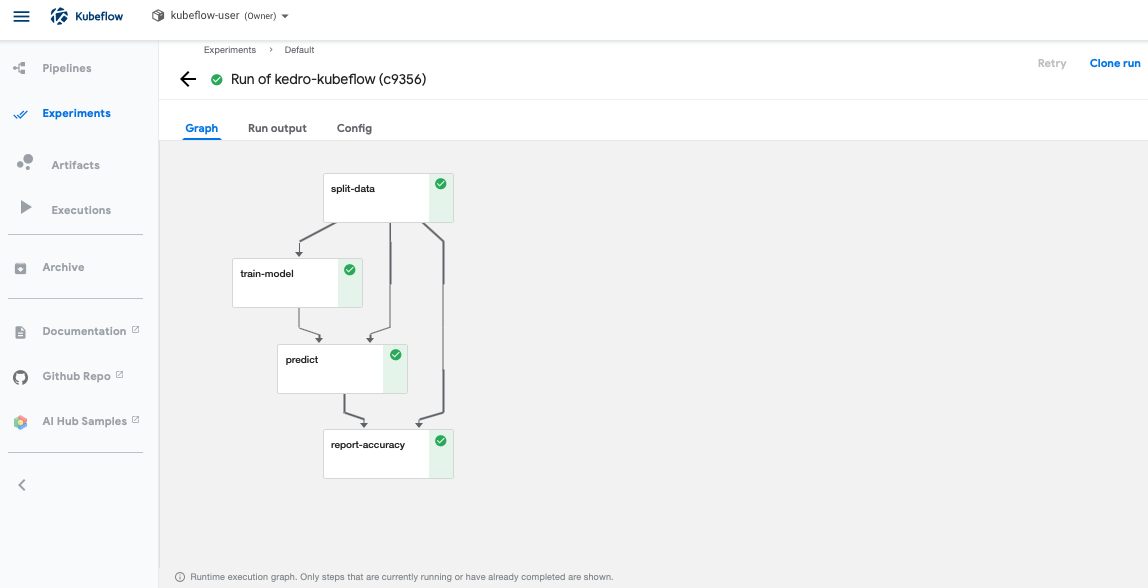
Once the run execution is complete, you can see the status of your pipeline graph.
In order to clean up your Kubeflow pipelines, go to “Pipelines” on the left panel, select the pipeline you want to delete, and delete the pipeline.
A Kubernetes Secrets can be removed with the following command.
kubectl delete secrets aws-secrets -n kubeflow
You can find more information about Kubeflow Pipelines in their documentation.