Kedro spaceflights tutorial
Scenario: It is 2160 and the space tourism industry is booming. Globally, there are thousands of space shuttle companies taking tourists to the Moon and back. You have been able to source amenities offered in each space shuttle, customer reviews and company information.
Project: You want to construct a model for predicting the price for each trip to the Moon and the corresponding return flight.
In this tutorial, we illustrate the typical Kedro workflow and the steps necessary to convert an empty Kedro project template into a working project.
In the text, we assume that you create an empty project and follow the flow of the tutorial by copying and pasting the example code into the project as we describe. This tutorial will take approximately 2 hours and you will learn each step of the Kedro project development workflow, by working on an example to construct nodes and pipelines for the price-prediction model.
Note
You may prefer to get up and running more swiftly so we provide the full spaceflights example project as a Kedro starter. To create the project, run kedro new --starter=spaceflights. When prompted for a project name, enter Kedro Tutorial. Subsequently, accept the default suggestions for repo_name and python_package by pressing enter. This will generate a project from the Kedro starter for the spaceflights tutorial so you can follow the tutorial without any of the copy/pasting.
Kedro project development workflow
When building a Kedro project, you will typically follow a standard development workflow:
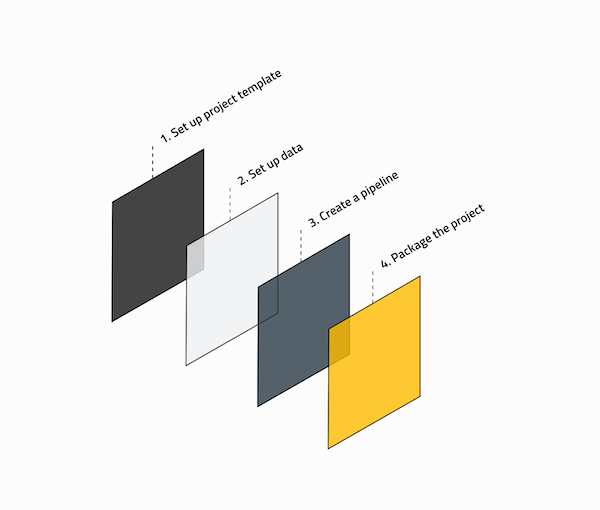
1. Set up the project template
Create a new project with
kedro newInstall project dependencies with
pip installConfigure the following in the
conffolder:Logging
Credentials
Any other sensitive / personal content
2. Set up the data
Add data to the
data/folderReference all datasets for the project in
conf/base/catalog.yml
3. Create the pipeline
Create the data transformation steps as Python functions
Construct the pipeline by adding your functions as nodes
Choose how to run the pipeline: sequentially or in parallel
4. Package the project
Build the project documentation
Package the project for distribution
Optional: Git workflow
Create a project repository
We recommend that you use git for source control, but Kedro doesn’t require it, and can work without any source control management system. This section is optional if you choose not to use a git repository.
Note
If you are unfamiliar with a typical git workflow, you can follow one of the most popular, known as Gitflow.
If you don’t have a local git repository for your project already, navigate to the project directory and create one:
git init
git remote add origin https://github.com/<your-repo>
Submit your changes to GitHub
As you work on a project, you will periodically save your changes. In a team, we suggest that you each develop your code on a branch and create pull requests to submit it to the develop or main branches:
# create a new feature branch called 'feature/project-template'
git checkout -b feature/project-template
# stage all the files you have changed
git add .
# commit changes to git with an instructive message
git commit -m 'Create project template'
# push changes to remote branch
git push origin feature/project-template
It isn’t necessary to branch, but if everyone in a team works on the same branch (e.g. main), you may have to resolve merge conflicts more often. Here is an example of working directly on main:
# stage all files
git add .
# commit changes to git with an instructive message
git commit -m 'Create project template'
# push changes to remote main
git push origin main